Compligo is an integrated compliance platform that helps customers with compliance training, license tracking, incident management, etc. Customers with a Compligo account can use the integration in the KeldairHR Marketplace to manage the compliance of their hired employees.
Getting started with Compligo
After logging in to your KeldairHR account, select Marketplace > Compliance from the menu. Click Learn More on the Compligo card to read about this integrated feature, including Compligo product details and contact information.
Create a Compligo account
If you don't have an existing Compligo account, you must contact Compligo directly using the contact information provided in the KeldairHR Marketplace to create one. Once credentialed, you will be notified by email that your Compligo account is active and ready to integrate.
Connect your Compligo account
If you are an existing Compligo customer, your activation of this integration is instantaneous. The moment you authorize the integration, it’s directly connected to your Compligo account and ready for use.
Follow these steps to connect your existing Compligo account to KeldairHR:
- After logging in to your hiring system, go to Marketplace > Compliance > Compligo.
- Click the Activate Compligo button and keep the window open so you can later add your Compligo credentials.
- In a separate browser window, log in to your Compligo system to retrieve your Compligo Site Name and Authentication Token for activation of the integration.
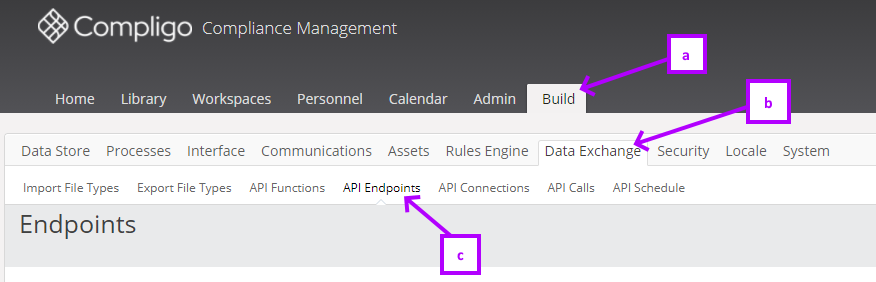
- From within Compligo, select Build from the main navigation, then select the Data Exchange tab, and then select API Endpoints.
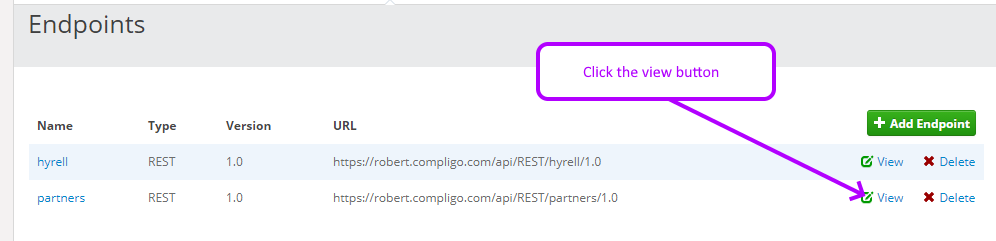
- From the Endpoint panel, click the view button for the partners link.
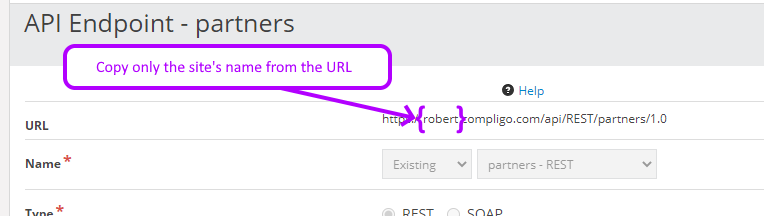
- Within the partners API Endpoint section, copy only your site’s name from the URL field.
- The site name will be the text between “https://” & “.compligo.com”.
- Return to the KeldairHR activation window in the Marketplace and paste the copied site name into the Compligo Site Name field.
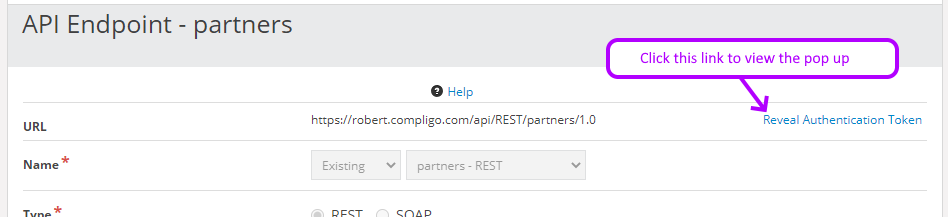
- Go back to the Compligo page and click the Reveal Authentication Token link, which will display a pop-up containing a long string of random numbers and letters. Copy the entire token.
- Return to the KeldairHR activation window in the Marketplace and paste the token into the Authentication Token field.
- To confirm the integration with KeldairHR, click the ACTIVATE COMPLIGO.
- Proceed to use the Compligo integration by clicking the Hire button in any job applicant’s file.
Compligo Activation
When you are notified that your company has been authorized or instantly connected, Compligo will be activated automatically in your applicant tracking system. To confirm the activation, select Marketplace from the menu and then Compliance. If integrated successfully, the switch in the upper right corner of the Compligo card will now be turned on and set to Active. You are now ready to send new hire information to Compligo after making a hire.
Sending new hire information to Compligo
When the integration is active and you hire a candidate in the KeldairHR system, members of the hiring team with permissions to hire can choose to transfer the new-hire data to your Compligo account immediately or select not at this time.
Follow these steps to transfer new-hire data to Compligo:
- Hire an applicant by clicking Hire in their applicant file and either choose to notify the job applicant of your hiring decision by sending the new hire message or hire without sending the email.
- Continue to select the best option to transfer the new-hire data to Compligo:
- To immediately transfer the new-hire’s data to Compligo, select Yes, send information to Compligo.
- Users will make the required selections: Select Manager, Hire Date, etc.
- If you selected Yes to the information transfer, a stream entry will be made in the applicant file indicating transmission success and noting the user, date, and time.
- The new hire information will then appear in Compligo’s compliance system.
- To return at a later time to initiate the transfer of the information, select No, not at this time.
- Upon returning to the Applicant File at a later time, users will see a Send to Compligo button in the Stages panel.
- To immediately transfer the new-hire’s data to Compligo, select Yes, send information to Compligo.
Opening Compligo
To manage compliance activity, users can sign in to their Compligo site directly. Once signed in to the Compligo dashboard, users with access/permissions can confirm receipt of new-hire data and manage additional HR & Compliance Initiatives.